Adorable Keepsake Footprint Ladybug Craft for Kids
Adorable Keepsake Footprint Ladybug Craft for Kids
This Footprint Ladybug Craft for kids is so adorable. Really this is the perfect keepsake craft to do with your kids now and enjoy for years to come!
We have some dear friends, whose eldest daughter is a huge fan of ladybugs. Every time I see ladybugs I think of her. Well, my daughter and I had a blast creating this ladybug craft for kids. It is really simple and such a great keepsake. Read on to find out how we created this ladybug.

What you will need:
- Red Tempura Paint
- Paintbrush
- 2 sheets of white cardstock
- 1 sheet of black cardstock
- Heart stamp and black paint or black stamping ink
- Black sharpie or marker
- Scissors
- Lid of Cool-whip container
- Lid of jelly jar
- Pencil
- 1″ circle punch
- 1/2″ circle punch
- Tape runner or double-sided tape
How to Make the Ladybug Wings
1, Paint your child’s foot with the red paint. Use more paint than you think you need.
- Press the painted foot onto the white cardstock. You might want to practice on a scrap piece of paper first. I found that having Sweet Pea hold onto my shoulder and actually stand onto the white cardstock worked best.
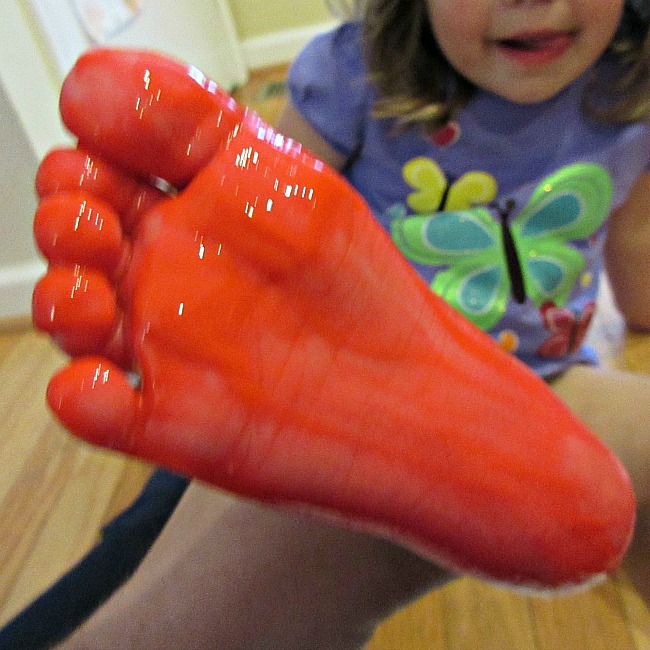
- Let the paint dry.
- Stamp black hearts onto the red stamped feet. In order to imitate the ladybug wings, stamp the hearts upside down onto the feet.
- If your heart stamp is just an outline (mine was), color the hearts in with the sharpie or marker.
- Cut the feet out.
How to Make the Ladybug Body
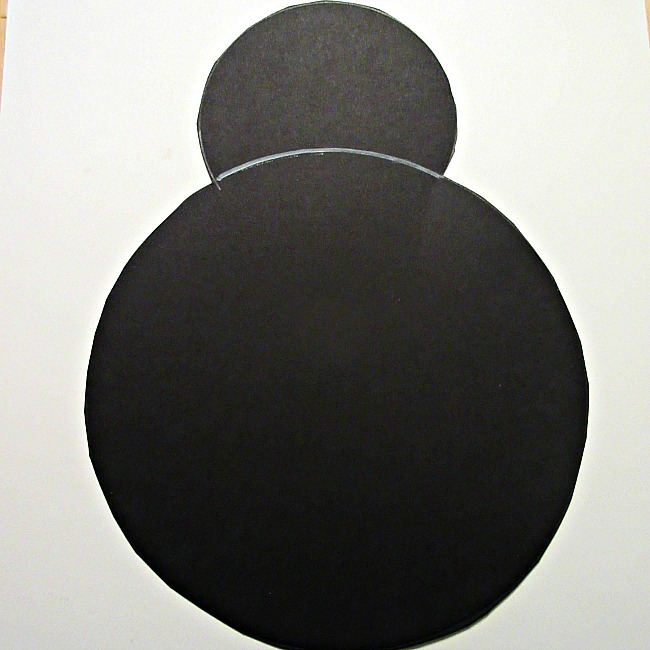
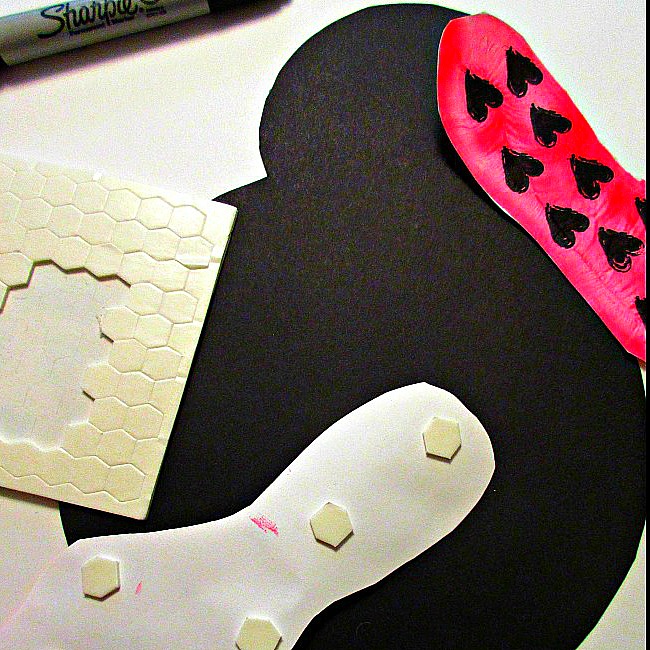
I experimented with this and botched it at first. I am sure I probably used the wrong kind of paint, but tempura paint definitely does not produce an opaque black ladybug body. Instead I made a body with black cardstock and I think it really turned out well.
- Trace the outline of the cool whip lid onto the black cardstock with pencil.
- Place the jelly jar lid on top of the cool whip lid outline and position it so that it forms the ladybug head. Trace the part of the jelly jar lid that forms the head.
- For the ladybug eyes, punch out two 1″ circles from the white cardstock. Punch out two 1/2″ circles from the black cardstock.
Ladybug Assembly
- Use the double-sided tape to stick the ladybug body/head to the second sheet of white cardstock. I angled it a little bit for effect.
- Stick about 5 or 6 paper-crafting dimensional stickers on the back of the feet and then stick the feet on top of the body for the wings. The dimensionals are nice because they make the wings pop. I think it looks more like wings if the heel end of the feet are on top, overlapping a bit.
- Stick the whites of the eyes onto the head of the ladybug with double-sided tape. Stick the pupils onto the whites of the eyes with one dimensional each. For the same effect, place the pupils on the bottom rim of the white circles.
- Draw the ladybug antennae with the sharpie marker. You might want to practice the antennae swirl on a scrap piece of paper first.
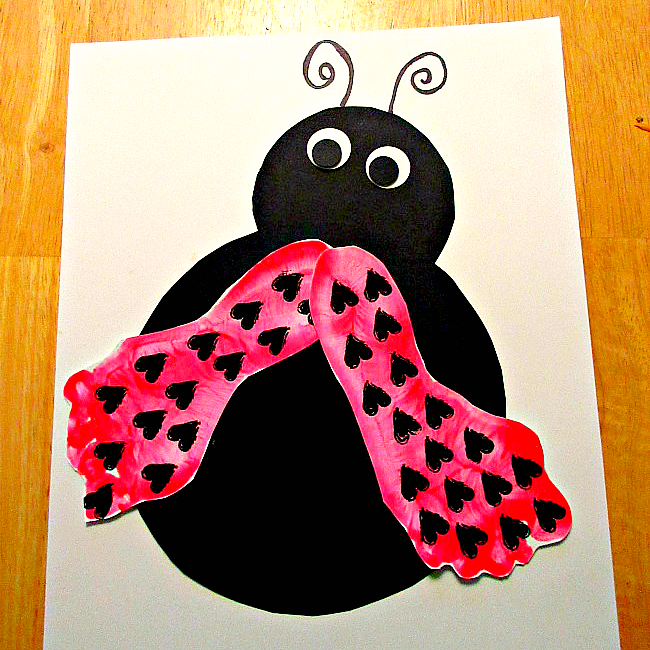
And there you have it!
I love this little craft so much and I hope you do too! Write the date on the corner so you know how old your kid was when you made it together!
Check Out These Fun Valentine’s Day Craft Ideas Too!
- Great Ideas for Valentine’s Day Boxes
- Heart Paper Wreath Craft
- Pom Pom Love Bug Craft
- Melted Bead Heart Suncatchers
- Cotton Ball Heart Painting Craft for Kids
- Craft Stick Love Bug Craft for Kids
- Valentine’s Day Cork Painting Craft for Kids
- Bee Mine Valentine’s Day Card for Kids to Make
- Sparkly Bow Band
- Ladybug Toilet Paper Roll Craft for Kids